
25 posts tagged with "API"

View All Tags
← Back to the liblab blog

If you build APIs, you need to document them. After all, for your users to use your API, they need to know how to use it. A common phrase I like to use as someone who writes a lot of docs is "if it's not documented, it does not exist" - your users can only use a feature if they can discover not only that it exists, but how to use it.

So what is API documentation? How should you write it? What should you include? What are the best practices? In this post I'll answer all of these questions and more and give you some best practices for creating API documentation.

What is API Documentation?

API documentation is the collection of materials your users can use to learn how to effectively build apps using your API. It should contain a range of things:

  • API Reference documentation for the endpoints, parameters, request and response objects, and expected status codes
  • Examples of using the API
  • Examples for the request and response objects to help users know what to pass and what to expect back
  • Error messages and status codes that can be returned, and what they mean
  • Basic usage guides such as how to get started, authentication, and common scenarios
  • Tutorials for more complex scenarios

Why is API Documentation Important?

API documentation is how your users know how to use your API. Without it, they will at best struggle to use your API, and at worst have no idea how to do anything. APIs are lacking in discoverability - without any kind of documentation you literally cannot know what endpoints to call. Even with a list of endpoints, you still need to know what to pass to them, and what to expect back.

For even better discoverability, you can use liblab to generate SDKs from your API specs. SDKs are a much better developer experience than using APIs directly, allowing you to discover the functionality and request and response objects through tools such as IDE autocompletion.

Documentation goes beyond discovering what your API does, it also explains details on how to use it effectively. This can include how to correctly authenticate, how to handle errors, and best practices for using the API.

For example, if you call an endpoint to retrieve some data and you get a 404 status code returned. Does that mean the data does not exist, or that you don't have permission to access it? Good documentation will explain this, and give you the information you need to handle it correctly.

How and where to write API Documentation?

The best place to write API documentation is in your API!

API Specs

When you publish your API, you should always also publish an API spec. This is generated documentation that lists your API endpoints and the request and response objects, and uses standards like Swagger or OpenAPI. The big advantage of this is a lot of the time this can be autogenerated! For example if you are using FastAPI (a Python framework for building APIs) to generate your API, you can have the framework create an OpenAPI spec with no extra code to write.

API specs as a default provide a list of endpoints, what is expected for endpoint parameters, and the request and response objects. These are JSON or YAML documents, so out the box not that easy to read - but there are plenty of tools that can convert these into nice hosted documentation (FastAPI for example has this built in), and again can be built into your API tools or hosting process.

For example, we have a llama store as a reference API for building SDKs against, and it has a spec that is 1115 lines of JSON (you can read it on our GitHub if you want some light bedtime reading). This is small compared to some specs we see at liblab, with over 40,000 lines not uncommon! Reading this much JSON is hard, so there are plenty of tools that render this direct from the API. For example, FastAPI as mentioned before generates OpenAPI specs, as well as hosting generated documentation:

The hosted docs for the llama store

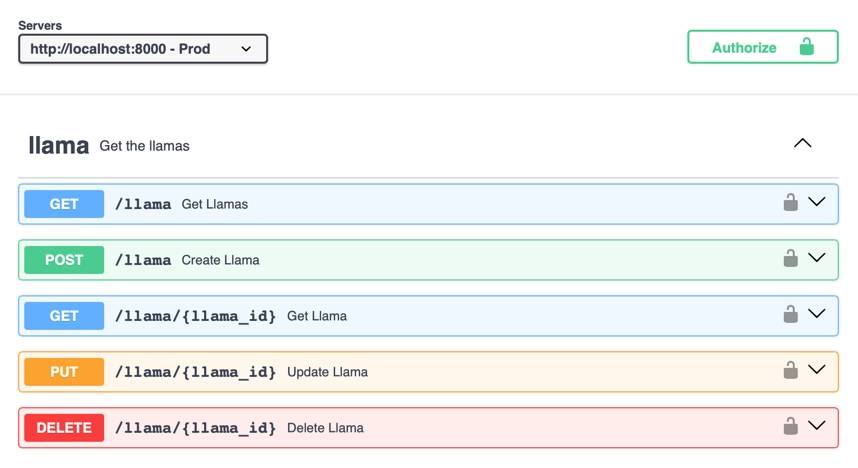
You can see these docs yourself, just clone the llama store, run it locally and access localhost:8000/docs.

Adding documentation to API Specs

As well as these specs listing your endpoints, they can also include a wide range of documentation. This includes:

  • Top level API documentation where you can describe in detail the API, such as how to use it, how to authenticate, and best practices
  • Endpoints descriptions
  • Descriptions and examples for endpoint parameters
  • Description and examples for request and response objects
  • Descriptions for different status codes, including why they might be returned, and what data might some with them

For example, the llama store has a top level description in the OpenAPI spec:

{
"openapi": "3.1.0",
"info": {
"title": "Llama Store API",
"description": "The llama store API! Get details on all your favorite llamas.\n\n## To use this API\n\n- You will need to register a user, once done you can request an API token.\n- You can then use your API token to get details about the llamas.\n\n## User registration\n\nTo register a user, send a POST request to `/user` with the following body:\n \n```json\n{\n \"email\": \"<your email>\",\n \"password\": \"<your password>\"\n}\n```\nThis API has a maximum of 1000 current users. Once this is exceeded, older users will be deleted. If your user is deleted, you will need to register again.\n## Get an API token\n\nTo get an API token, send a POST request to `/token` with the following body:\n \n```json\n{\n \"email\": \"<your email>\",\n \"password\": \"<your password>\"\n}\n```\n\nThis will return a token that you can use to authenticate with the API:\n\n```json\n{\n \"access_token\": \"<your new token>\",\n \"token_type\": \"bearer\"\n}\n```\n\n## Use the API token\n\nTo use the API token, add it to the `Authorization` header of your request:\n\n```\nAuthorization: Bearer <your token>\n```\n\n\n",
}
}

This is actually set in code - something that FastAPI supports is adding these kinds of OpenAPI values to your API code:

app = FastAPI(
servers=[{"url": "http://localhost:8000", "description": "Prod"}],
contact={"name": "liblab", "url": "https://liblab.com"},
description="The llama store API! Get details on all your favorite llamas.\n\n## To use this API\n\n- You will need to register a user, once done you can request an API token.\n- You can then use your API token to get details about the llamas.\n\n## User registration\n\nTo register a user, send a POST request to `/user` with the following body:\n \n```json\n{\n \"email\": \"<your email>\",\n \"password\": \"<your password>\"\n}\n```\nThis API has a maximum of 1000 current users. Once this is exceeded, older users will be deleted. If your user is deleted, you will need to register again.\n## Get an API token\n\nTo get an API token, send a POST request to `/token` with the following body:\n \n```json\n{\n \"email\": \"<your email>\",\n \"password\": \"<your password>\"\n}\n```\n\nThis will return a token that you can use to authenticate with the API:\n\n```json\n{\n \"access_token\": \"<your new token>\",\n \"token_type\": \"bearer\"\n}\n```\n\n## Use the API token\n\nTo use the API token, add it to the `Authorization` header of your request:\n\n```\nAuthorization: Bearer <your token>\n```\n\n\n",
openapi_tags=tags_metadata,
version="0.0.1",
redirect_slashes=True,
title="Llama Store API",
)

This then gives these docs:

The rendered top level description

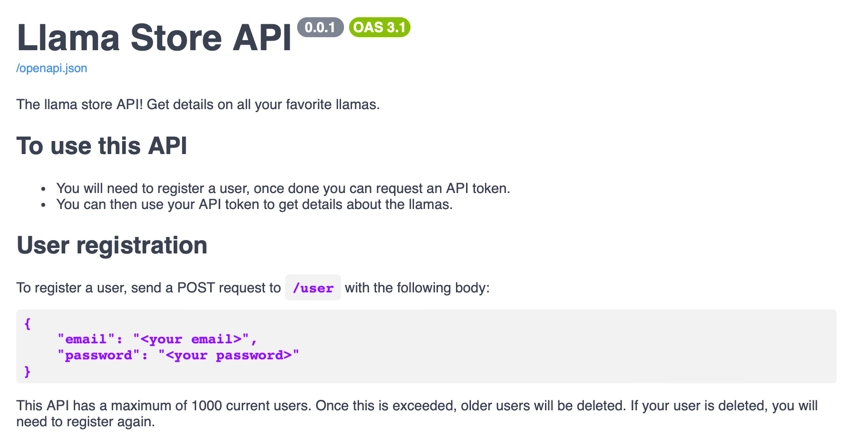
You may notice that the description has markdown! This is nicely rendered in the docs. This is a great way to add rich documentation to your API specs, and is a great way to add tutorials and best practices. This rich documentation can also provide code examples, error messages and more.

This generated documentation should not just be made available via your API, but also hosted on a public documentation site.

Additional documentation

As well as documenting your API in the API spec, you can also add additional documentation on your public documentation site. Your API docs become the reference documentation, but you should add tutorials, how to guides, and best practice documentation as well.

Your API spec documentation can define what each endpoint does and how to call it, but it may not define the correct flow that a user might take for a typical task. For example, if your API has long running tasks, you may need to document how a user can trigger a task, check the status, then retrieve the result, all using different endpoints.

Who Should Write API Documentation?

As someone who started out in engineering before I moved to developer relations, I know how hard it is to write documentation. It's not something that comes naturally to most engineers, and it's not something that most engineers enjoy doing. But it is something that is important, and something that needs to be done.

In a perfect world, your documentation would be written by a dedicated technical writer, working in collaboration with the engineers to understand how the API works, and with the product teams to understand the end-to-end user experience. They should then feed this documentation back to the engineers to add to the API spec.

We all don't live in a perfect world though, so the next best thing is to have the engineers and product teams write the documentation. They know the API best, and can write the most accurate documentation.

Ideally you should use a framework for your API that makes writing these docs easy - for example FastAPI as mentioned before makes it easy to add documentation to your API code, and then generates the OpenAPI spec for you. This way you can even 'enforce' this by having a check for documentation in your pull request review process, or in a linting check in your CI/CD pipeline.

As an API provider - make sure you have documentation firmly in your process!

API Documentation Best Practices

Here are some API documentation best practices for writing api docs:

1 - Write in clear language

A good rule for everyone writing any documentation, including creating API documentation, is to be as clear as possible. Avoid jargon, unless it is necessary technical terminology for your product, and find ways to define this, or link to other documentation. There are some things you can assume your users know, but don't assume they know everything. It's helpful to define a minimally qualified reader, which defines the minimum knowledge or skills for each piece of documentation, and write for them.

For example, you can assume that your users know how to call an API (though a link to a guide on this is always helpful), but you can't assume they know how to authenticate, or what a JSON object is. As you document more advanced functionality, you can assume some knowledge of your API, such as assuming they know how to create a new user when documenting how to interact with that user.

2 - Show, don't tell

For any documentation, showing is better than telling. Examples always help - it's amazing how much easier it is to understand something when you can see it in action.

This is true for API documentation as well. If you want to teach someone how to get data from your API, show them the request, and what response they will get. When using your API, users could be using one of many programming languages, so provide code examples for the main ones. For example, if your API is targeted towards an enterprise, have code examples in C# and Java.

3 - Add references docs, tutorials, and guides

Documentation comes in a variety of modes, and it is good to implement them all. These are:

  • Tutorials - learning oriented
  • How to guides - task oriented
  • Explanation - understanding oriented
  • Reference docs - information oriented

I won't go into these in more depth here, but read up on Diátaxis for more information.

Reference docs and explanation should be in your API specs, and hosted on your public documentation site. Tutorials and how to guides can be on your public documentation site.

Your tutorials should also always have a quickstart. Humans like instant gratification, so being able to very quickly get started with an API is a great motivator to learn more and use it more. If a user struggles to even do the basics, they are likely to drop your API and move to a competitor. That initial documentation is crucial to keeping users engaged.

4 - Add code samples

Code samples always help! You users are engineers after all, and will be accessing your API using code. Code samples allow them to quickly craft API calls, and see what they will get back. They also allow you to show best practices, such as how to handle errors, and how to handle pagination.

Obviously the best code samples are using an SDK instead of an API - something liblab can help with!

5 - Keep it up to date

This is sometimes the hardest. When an API has no documentation there's often a big effort around writing api documentation once, usually before a big release, but no continuous time given to keeping the api docs up to date - changing them as features change or adding new features.

This is why it's important to have documentation as a part of your engineering and release process. Don't let any feature out the gate without docs, add documentation to your PR processes, or add checking for docs to your CI/CD pipelines. If you have a dedicated technical writer, they can help with this, but if not, make sure the engineers and product teams are writing the docs as they write the code.

Feature flags can be particularly helpful here, allowing features to be released, but not turned on until the docs are ready (and maybe turned on for the doc writers so they can verify what they are writing).

6 - Make it accessible

Accessibility is important for documentation as well as your API. Make sure your documentation is accessible to everyone, including those with visual impairments. This means when you render it on a docs site using good color contrast, and making sure any images have alt text. It also means making sure your documentation is accessible to screen readers, and that any code samples are accessible.

You also may have users who don't speak the default language of your company, so consider translating your documentation into other languages. This is a big effort, but can be done in stages, starting with machine translations for the most popular languages for your users, and moving on to human efforts.

7 - Make it someones problem

The best way to ensure you have good docs, is to have someone responsible. This is the person who can hold up a release or turning on a feature flag if docs are not ready. Without someone taking responsibility, it's easy for docs to be forgotten about, and for them to become out of date. "Oh, we'll do it later, we need to release for customer X" is the start of the slippery slope to no useful docs.

Make your SDKs better with good API documentation

The other big upside of good API documentation is it can automatically become the documentation for your SDK. With liblab, every time you generate an SDK, the documentation and examples are lifted from your API spec and included in the SDK. For example, with the following component in your API spec:

APITokenRequest:
properties:
email:
type: string
title: Email
description: The email address of the user. This must be unique across all users.
password:
type: string
title: Password
description: The password of the user. This must be at least 8 characters long, and contain
at least one letter, one number, and one special character.

You would get the following documentation in your Python SDK:

A documentation popup for an APITokenRequest showing the descriptions of the email and password properties

Conclusion

Your users deserve good documentation for your API, and for any SDKs generated from them. With liblab, you can generate high quality SDKs from your API specs, and include the documentation and examples from your API spec in the SDKs. This means you can focus on writing good API specs and writing good API documentation, and let liblab do the hard work of generating the SDKs and documentation for you.

← Back to the liblab blog

This is a guest post by Emmanuel Sibanda, a Full Stack Engineer with expertise in React/NextJS, Django, Flask who has been using liblab for one of his hobby projects.

Boxing data is very hard to come by, there is no single source of truth. One could argue that BoxRec is the 'single source of truth'. However, you will only find stats on a boxer's record and a breakdown of the fights they have had on BoxRec. If you want more nuanced data to better understand each boxer you would need to go to CompuBox to get data on punch stats recorder per fights. This doesn't include all fights, as they presumably only include fights that are high profile enough for CompuBox to show up and manually record the number and type of punches thrown.

Some time back I built a project automating retrieving data from BoxRec and enriching this with data from CompuBox. With this combination of data, I can analyze;

  • a boxer's record (eg. what is the calibre of the opponents they have faced, based on their opposition's track record)
  • a boxer's defense (eg. how many punches do their opponents attempt to throw at them in each recorded fight and on average, how many of these punches actually land). I could theoretically breakdown how well the boxer defends jabs, power shots
  • a boxer's accuracy using similar logic to above
  • how age has affected both a boxer's accuracy and defense based on the above two points
  • a comparison of whether being more defensive or accurate has a correlation to winning a fight (eg. when a fight goes the full length, do judges often have a bias towards; accuracy, aggression or defense)

These are all useful questions, if you want to leverage machine learning to predict the outcome of a fight, build a realistic boxing game or whatever reason, these are all questions that could help you construct additional parameters to use in your prediction model.

Task: Create an easily accessible API to access the data I have collected

Caveat: I retrieved this data around November 2019 - a lot has happened since then, I intend to fetch new data on the 19th of November 2023.

When I initially built this project out, initially a simple frontend enabling people to predict the outcome of a boxing match based on a machine learning model I built using this data, I got quite a few emails from people asking me how I got the data to build this model out.

To make this data easily accessible, I developed a FastAPI app, with an exposed endpoint for data retrieval. The implementation adheres to OpenAPI standards. I integrated Swagger UI to enable accessibility directly from the API documentation. You send the name of a boxer and receive stats pertaining their record.

Creating an SDK to enable seamless integration using liblab

I intend to continue iteratively adding more data and ensuring it is up to date. In order to make this more easily accessible I decided to create a Software Development Kit. In simple terms, think of this as a wrapper around the API, that comes with pre-defined methods that you can use, reducing how much code you would need to write to interact with the API.

In creating these SDKs, I ran into a tool; liblab, an SDK as a service platform that enables you to instantly generate SDK in multiple languages. The documentation was very detailed and easy to understand. The process of creating the SDK was even simpler. I especially like that when I ran the command to build my SDKs I got warnings with links to OpenAPI documentation to ensure that my API correctly conformed to OpenAPI standards, as this could result in creating a subpar SDK.

Here's a link to version 1 of the BoxingData API.

Feel free to reach out regarding any questions you have, data you want me to include and if you want me to send you the SDKs (Python and TypeScript for now). You can find me on LinkedIn and Twitter.

← Back to the liblab blog

SDK and API are 2 terms banded around a lot when developers think about accessing services or other functionality. But what are they, and what are the differences between them? This post will teach you everything you need to know and how SDKs can benefit your software development process!

Key Differences: SDK vs API

API (Application Programming Interface) is a set of rules that allow different software applications or services to communicate with each other. It defines how they can exchange data and perform functions. APIs are often used for integrating third-party services or accessing data from a platform, and they are language-agnostic.

SDK (Software Development Kit) is a package of tools, code libraries, and resources designed to simplify software development for a specific platform, framework, or device. SDKs are platform-specific and provide pre-built functions to help developers build applications tailored to that platform. They are typically language-specific and make it easier to access and use the underlying APIs of the platform they are designed for.

As we compare SDK vs API, here are some key differences:

APISDK
Pass data as JSONPass data as strongly typed objects
Call endpoints defined using stringsCall methods or function
No compiler or linter checkingCompiler and linter checking
No automatic retriesAutomatic retries can be defined in the SDK
You have to read the docs to discover services or learn what data to pass or receiveIntellisense and documentation
Can be called from any programming language, as well as tools like Postman or low/no-code toolsCan only be called from compatible languages

What is an Application Programming Interface (API)?

An API, or application programming interface is an interface to a system that application programmers can write code against. This reads like I'm just juggling the words around, so let's break down this statement.

There are many systems and services out there that you might want to integrate into your application. For example, you might want to use Stripe as a payment provider. As you program your application, you need to talk to these services, and these services define an interface you can use to talk to them - this interface lists all the things you can do with the service, and how to do them, such as what data you need to send or what you will get back from each call.

Application Programming Interfaces in the modern world

In the modern software development world we think of APIs as a way of making calls to a service over networks or the internet using standard protocols. Many services have a REST API - a set of web addresses, or URLs, you can call to do things. For example, a payment provider API will have endpoints you can call to create a payment or authorize a credit card. These endpoints will be called using HTTP - the same technology you use when browsing the internet, and can take or return data either in the URL, or attached to the call in what is called the body. These are called using verbs - well defined named actions, such as GET to get data, or POST to create data.

An API with 2 methods exposed, a GET and a POST on the /user endpoint An API with 2 methods exposed, a GET and a POST on the /user endpoint

Calling APIs

Calling an API endpoint is referred to as making a request. The data that is returned is referred to as a response.

APIs can be called from any programming language, or from tools like Postman.

There are many protocols APIs can use, including REST, gRPC, GraphQL and SOAP. REST is the most common, and the one I'll be referencing in this article.

What is a Software Development Kit (SDK)?

A software development kit is a code library that implements some kind of functionality that you might want to use in your application.

What can SDKs be used for?

SDKs can implement a huge range of functionality via different software components - they can include visual components for desktop or mobile apps, they can interact with sensors for embedded apps, or provide frameworks to speed up application development.

SDKs for your APIs

Another use case for SDKs is to provide a wrapper around an API to make it easier to call from your application. These SDKs make APIs easier to use by converting the calls you would make into methods, and wrap the data you send and receive in objects.

An SDK with 2 methods exposed, a getUser method that wraps the GET on /user and a createUser that wraps the POST on /user An SDK with 2 methods exposed, a getUser method that wraps the GET on /user and a createUser that wraps the POST on /user

These SDKs can also manage things like authentication or retries for you. For example, if the call fails because the service is busy, the SDK can automatically retry after a defined delay.

For the rest of this article, when I refer to SDKs I'll be talking about SDKs that wrap APIs.

How Do APIs Work?

APIs work by exposing a set of endpoints that you can call to do things.

API Endpoints

These endpoints are called using verbs that roughly align to CRUD (create, read, update, delete) operations.

For example, you might have a user endpoint that handles the following verbs:

VerbDescription
GETRead a user
POSTCreate a user
PUTUpdate a user
DELETEDelete a user

API Data

Data is typically sent and returned as JSON - JavaScript object notation. For example, a user might be returned as:

{
"id": 42,
"firstname": "Jim",
"lastname": "Bennett",
"email": "jimbobbеnnеtt@liblab.com"
}

How Do SDKs Work?

Software Development Kits work by wrapping the API calls in code that is easier for developers to use.

Creating a user with an API

For example, if I wanted to create a user using an API, then my code would need to do the following:

  1. Create an HTTP client - this would be code from a library that can make HTTP calls.
  2. Create a JSON object to represent my user.
  3. If my API requires authentication, I would need to get an access token and add it to the request.
  4. Send the JSON object to the API endpoint using the HTTP client.
  5. Get a response and see if it was successful or not.
  6. If it was successful, parse the response body from JSON to get the user Id.

This is a number of steps, and each one is error prone as there is no compiler or linter to help you. For example, if you sent the first name in a field in the JSON object called "first-name" and the API expected it to be "firstname" then the API call would fail at run time. If you forgot to add the access token, the API call would fail at run time. If you forgot to check the response, your code would continue to run and would fail at some point later on.

Creating a user with an SDK

An SDK on the other hand would implement most of this for you. It would have a class or other strongly typed definition for the user object, and would handle things like authentication and error checking for you. To use an SDK you would:

  1. Create an instance of the SDK class.
  2. Set the authentication token once on the SDK so it can be used for all subsequent calls.
  3. Create an instance of the user object, and set the properties.
  4. Call the SDK method to create the user, passing in the user object.
  5. If this fails, an exception would be thrown, otherwise the user Id would be returned.

Benefits of Application Programming Interfaces

APIs are the perfect way to expose a service to your internal infrastructure or the world via the internet. For SaaS (Software-as-a-Service) companies like Auth0 and Stripe, their APIs provide the services that their customers use to integrate with their applications. Internally organizations can build microservices or other internal services that different teams can use to build applications. For example, a company might have a user service that manages users, and a product service that manages products. These services would expose APIs that other teams can use to build applications.

By using a standard protocol such as REST you are providing the most widely used interface - development tools like programming language and many low/no-code technologies can call REST APIs. This means that your service can be used by any application, regardless of the technology it is written in.

Pretty much. every service should have an API if it needs to be called from an application.

Benefits of Software Development Kits

SDKs on the other hand are software components that provide wrappers over APIs. They make it easier to call APIs without making mistakes by providing things like type safety and error handling. If you use the wrong name for a field on an object, your compiler or linter will tell you (probably as soon as you type it with a red squiggly in your IDE). If you forget to add an access token, the SDK will throw an exception, but once set it can be used for all calls, and not need to be set every time. If the API call fails, the SDK can retry for you.

The benefit of an SDK is this hand-holding - it's a wrapper around the API that makes your life easier. An SDK takes nothing away from your API, developers can still call it directly if they are so inclined, but the SDK makes it substantially easier to use.

How and When to Choose Between SDKs or APIs?

As a provider of a service, there is no choice as such. You have to provide an API so software developers can call you service. Should you provide an SDK as well as part of your development process? Well, yes - it improves the experience for your users, and makes it easier for them to use your service. If you don't provide an SDK, then your users will have to write their own, and that's a lot of work for them. Keep your customers and users happy, right?

Conclusion

In this post we've looked at the differences between SDKs and APIs, and when you might use one over the other. We've seen that APIs are the interface to a service, and SDKs are wrappers around APIs that make them easier to use. We've also seen that APIs are the best way to expose a service to the world, and SDKs are the best way to make it easier to use an API.

Can I automate SDK generation?

The obvious question now is how do I create an SDK for my API. You could write one yourself, but why do that when liblab can automate SDK generation for you as part of your software development process? Check out liblab.com for more information and to sign up!

← Back to the liblab blog

In the ever-evolving software development landscape, selecting the right tools can make or break your project's success. With a plethora of options available, it can be overwhelming to choose the best one. In this blog post, we will discuss why liblab stands out as a superior choice over its competitors in various aspects, including user-friendliness, customization, support, security, reliability, cost, number of supported languages, and documentation.

User-Friendliness: Human Readability and IDE Compatibility

liblab prides itself on its user-friendly nature. The code generated by liblab looks like it was written by a human rather than a machine, making it easier to read and understand. Additionally, liblab's code is easily picked up by Integrated Development Environments (IDEs), providing users with helpful type hinting for a seamless development experience.

Customization

liblab offers unique customizations tailored to your business’ needs, with over 147 hours of investment put into refining these features. Regardless of your needs, liblab can be customized to provide a solution that meets your unique requirements and ensures the best possible development experience.

Support: A Comprehensive Solution

Unlike many competitors, liblab is more than just a product; it is a complete solution that includes both product and service. With a dedicated Technical Account Manager (TAM), liblab ensures that you meet Rapyd's developer experience goals via SDKs and documentation.

Security: SOC2 Compliance and Best Practices

Security is paramount in today's digital world. liblab is SOC2 compliant and continuously incorporates best practices to ensure that your data and developers are protected at all times.

Reliability: On Call Support and Code Reliability

liblab offers on-call support with Service Level Agreements (SLAs) that guarantee a response to your requests within 12 hours. Furthermore, liblab generates tests for all its SDKs, ensuring code reliability and reducing the likelihood of unexpected issues.

Cost: Upfront Savings and Minimized Backend Costs

By choosing liblab, you can significantly reduce costs associated with building and maintaining your development infrastructure. liblab's upfront cost eliminates the need to hire a team and develop subject matter expertise over time, allowing your engineers to focus on higher ROI, mission-critical work.

Number of Supported Languages: Idiomatic and Quality-driven

By the end of the year, liblab plans to support six languages, with a focus on idiomatic patterns. This ensures that each language is of high quality and useful for developers. While competitors may offer more partially-maintained languages, liblab emphasizes quality first, with quantity following soon after.

Documentation: SDK Embedded Docs

liblab auto-generates powerful documentation that includes code examples from your SDKs, making it easier for developers to understand and use the software.

In conclusion, liblab outshines its competition in multiple aspects, making it the ideal choice for your development needs. With its user-friendly code, extensive customization, comprehensive support, strong security, impressive reliability, cost-effective pricing, commitment to quality-driven language support, and robust documentation, liblab is the clear winner in the race for the best development solution.

← Back to the liblab blog

As frontend developers, we often face the challenge of transforming a complex API into an intuitive experience for the end user. We need to account for all possible inputs for every API call, while only showing the user those inputs that are relevant to them. In this article, we will show how to add query params to a web applications, so that we can greatly enhance both the experience of the users and our own development experience.

Introducing the NASA APOD API

Let's take for example the NASA APOD (Astronomy Picture of the Day) API. The docs define a base url and the parameters that the API can accept, which include date, start_date, end_date and count:

ParameterType                    DefaultDescription
dateYYYY-MM-DDtodayThe date of the APOD image to retrieve
start_dateYYYY-MM-DDnoneThe start of a date range, when requesting date for a range of dates. Cannot be used with date.
end_dateYYYY-MM-DDtodayThe end of the date range, when used with start_date.
countintnoneIf this is specified then count randomly chosen images will be returned. Cannot be used with date or start_date and end_date.
thumbsboolFalseReturn the URL of video thumbnail. If an APOD is not a video, this parameter is ignored.
api_keystringDEMO_KEYapi.nasa.gov key for expanded usage

However, not all params can be given at the same time. The API expects either date or start date and end date or count*.* Since a combination of two or more is not allowed, we cannot pass, for example, count and date.

Translating the API into a User Interface

We can make this intuitive to the end user by displaying a dropdown with options to search by, and display only the relevant input fields based on the user's choice:

  • If the user selects to search by “count”, the would be presented with a single numeric input.
  • If the user selects “data”, they would be presented with a single date picker.
  • If the user selects “range”, they would be presented with two date pickers, one to select the start date and one to select the end date.

Searching APOD by a date range

So, depending on their selection, the user would be presented with either a single date picker, two date pickers (for start and end dates) or a number input.

Storing the user input in query params

To easily keep track of the user's selection, we can store their “search by” choice, along with the values of their inputs, as query params in the page's url. For example, when selecting to search by range and filling in a start date and an end date, the query params would include:searchBy, start and end.

Searching apod with query parameters

In total, the query string would contain ?searchBy=range&start=2022-06-21&end=2023-06-21. And given this query, we have all we need to determine the values of each of the input fields. So if the user were to refresh the page, the input fields would be populated with the correct values.

A simple data flow

This allows us to create a simple flow of data, where input by the user updates the query params, and the query params are used as input for the application itself. This can be illustrated in the following diagram:

The query parameter flow

On page load, we would validate the query params, and use the validated values to both populate input fields and make the correct API calls. For example, if the query string is:

?searchBy=range&start=2022-06-21&end=2023-06-21, these are the query params:

  • searchBy with the value “range”
  • start with the value 2022-06-21
  • end with the value, 2023-06-21

Given these query params, we can populate the input fields:

  • The “search by” dropdown with the value "range",
  • The “start date” picker with the date of 06/21/2022,
  • The “end date” picker with the date of 06/21/2023

Making the API Call

We can also use the query params to make an API call to APOD, providing it with the start date and end date. The following would be the complete URL of the API call:

  • https://api.nasa.gov/planetary/apod?api_key=DEMO_KEY&start_date=2022-06-21&end_date=2023-06-21

Finally, the response of the API call will be used to display the search results. When the user updates any of the input fields, whether it's any of the date selections or the “search by” option, the query params in the url would be updated, starting over the cycle.

Conclusion

Of course, there are many additional considerations. For example, we may want to perform validations when receiving the user's input. We would also want to ensure that the API calls we make are correct: passing the right params and knowing the shape of the response are just a few of the common problems in that space. Having an SDK can make this process easier: here at liblab we make the it easy for developers to create an SDK from any API, allowing the communication with their backend to be as simple as making a function call.

← Back to the liblab blog

liblab is excited to be sponsoring APIWorld 2023 where you can join thousands of global technical leaders, engineers, software architects, and executives at the world’s largest and longest-running API & microservices event – in its 11th year!

The API world logo

This conference is running in-person at the Santa Clara Convention Center, and online a week later. We will be there, both in person and online, so come and meet us and learn about how liblab can generate better SDKs for your APIs!

Get a free SDK

liblab is currently in beta, but if you want to skip the queue and get early access, talk to us at APIWorld. We'll be granting early access to everyone at the event.

We'll also be on hand to review API specs, and generate a high quality, human readable SDK for your API. You can then see how your developer experience is improved by a good SDK. Just leave us your email address and a link to your API spec at our booth, and we'll send you a copy of your SDK.

Learn from our experts

On our booth you will find some of the worlds finest (in our opinion) OpenAPI experts, who will be able to discuss your API and help you to produce the best API spec possible that will allow you to quickly generate high quality SDKs. We can talk you through some common problems, as well as best practices for API design. If you want a sneak preview of our expertise, check out our why your OpenAPI spec sucks post from Sharon Pikovski.

We also want to learn from you! We'll give you the chance to vote on your favorite SDK languages, and share your stories of the best and worst SDKs you've used. If you're up for it we'd love to share your tales on our YouTube channel.

I'll also be giving a demo-heavy session called From APIs to SDKs: Elevating your Developer Experience with automated SDK generation where I will talk through why SDKs are better for your customers than accessing APIs directly (yup, they really are). I'll also show how you can automate the process of generating SDKs by integrating liblab into your CI/CD pipelines. There will be plenty of code on show and resources to help you re-create the demos yourself. I'll be speaking on Thursday 26th October at 2:30pm in the Expo Hall.

A picture of Jim on a stage at a conference standing next to a podium with a laptop on it. Jim is wearing a black t-shirt and is working on the laptop

More details on the APIWorld session page.

Meet the team

We are busy preparing for our presence in the expo hall at the event. Literally - half of my home office is full of booth bits 😁. We'll be there to talk APIs and SDKs, with a load of demos showing how you can use liblab to quickly generate SDKs, and implement this SDK generation into your CI/CD pipelines.

As expected, we'll have some swag to give away - in our case, edible swag! I'm personally not a fan of a lot of conference swag, we all have our fill of cheap pens, USB cables that break, notebooks, and terrible mugs, and a lot of this ends up in landfill. To be more sustainable, we'd rather give you something that leaves a more pleasant taste in your mouth, literally. Come and see us to find out more!

We'll also have some stickers, after all, who doesn't love stickers?

2 liblab stickers on a wooden table. One has the liblab logo, a simple line drawn llama face with curly braces for the side of the head, and liblab.com, the other has a version of the liblab llama logo with hearts for eyes and the caption love your SDK

We'll be available on a virtual booth during the online event, so if you can't make it to Santa Clara, you can still come and meet us online. No stickers or edible swag at the virtual event though, sorry!

Meet the llama

You may also get the chance to meet a real life* llama 🦙. Snap a pic with our llama and tweet it with the hashtag #liblabLlama and tag @liblaber to get a special sticker!

A sticker with a llama mascot and the text I met the liblab llama

* This is not actually true, it's Sean in a llama costume.

See you there - on us!

We have a number of open tickets to give away for the in-person and virtual events with access to the expo hall and some of the sessions. If you want to come meet us, then sign up for our beta and we'll send you a ticket. We'll be giving away tickets on a first come, first served basis, so don't delay!

Otherwise, head to apiworld.co to get your tickets now. We can't wait to meet you!

← Back to the liblab blog

A mix of anticipation and dread washes over me as I open a new inbound email with an attached specification file. With a heavy sigh, I begin scrolling through its contents, only to be greeted by disappointment yet again.

The API request bodies in this specification file suffer from a lack of essential details, specifically the absence of the actual properties of the HTTP call. This makes it difficult to determine the expectations and behavior of the API. Not only will API consumers have a hard time understanding the API, but the lack of properties also hinders the use of external libraries for validation, analysis, or auto-generation of output (e.g., API mocking, testing, or liblab's auto SDK generation).

After encountering hundreds of specification files (referred to as specs) in my role at liblab, I’ve come to the conclusion that most spec files are in varying degrees of incompletion. Some completely disregard the community standard and omit crucial information while others could use some tweaking and refinement. This has inspired me to write this blog post with the goal of enhancing the quality of your spec files. It just so happens that this goal also aligns with making my job easier.

In the upcoming sections, we'll go over three common issues that make your OpenAPI spec fall short and examine possible solutions for them. By the end of this post you’ll be able to elevate your OpenAPI spec, making it more user-friendly for API consumers, including developers, QA engineers, and other stakeholders.

Three Reasons Why Your OpenAPI Spec Sucks

You’re Still Using Swagger

Look, I get it. A lot of us still get confused about the differences between Swagger and OpenAPI. To make things simple you can think of Swagger as the former name of OpenAPI. Many tools are still using the word "Swagger" in their names but this is primarily due to the strong association and recognition that the term Swagger had gained within the developer community.

If your “Swagger” spec is actually an OpenAPI spec (indicated by the presence of "openapi: 3.x.x" at the beginning), all you need to do is update your terminology.

If you’re actually using a Swagger spec (a file that begins with "swagger: 2.0”), it's time to consider an upgrade. Swagger has certain limitations compared to OpenAPI 3, and as newer versions of OpenAPI are released, transitioning will become increasingly challenging.

Notable differences:

  • OpenAPI 3 has support for oneOf and anyOf that Swagger does not provide. Let us look at this example:
openapi: 3.0.0
info:
title: Payment API
version: 1.0.0
paths:
/payments:
post:
summary: Create a payment
requestBody:
required: true
content:
application/json:
schema:
oneOf:
- $ref: "#/components/schemas/CreditCardPayment"
- $ref: "#/components/schemas/OnlinePayment"
- $ref: "#/components/schemas/CryptoPayment"
responses:
"201":
description: Created
"400":
description: Bad Request

In OpenAPI 3, you can explicitly define that the requestBody for a /payments POST call can be one of three options: CreditCardPayment, OnlinePayment, or CryptoPayment. However, in Swagger you would need to create a workaround by adding an object with optional fields for each payment type:

swagger: "2.0"
info:
title: Payment API
version: 1.0.0
paths:
/payments:
post:
summary: Create a payment
consumes:
- application/json
produces:
- application/json
parameters:
- name: body
in: body
required: true
schema:
$ref: "#/definitions/Payment"
responses:
"201":
description: Created
"400":
description: Bad Request

definitions:
Payment:
type: object
properties:
creditCardPayment:
$ref: "#/definitions/CreditCardPayment"
onlinePayment:
$ref: "#/definitions/OnlinePayment"
cryptoPayment:
$ref: "#/definitions/CryptoPayment"
# Make the properties optional
required: []

CreditCardPayment:
type: object
# Properties specific to CreditCardPayment

OnlinePayment:
type: object
# Properties specific to OnlinePayment

CryptoPayment:
type: object
# Properties specific to CryptoPayment

This example does not resemble the OpenAPI 3 implementation fully as the API consumer has to specify the type they are sending through a property field, and they also might send more than of the fields since they are all marked optional. This approach lacks the explicit validation and semantics provided by the oneOf keyword in OpenAPI 3.

  • In OpenAPI you can describe multiple server URLs while in Swagger you’re bound to only one:
{
"swagger": "2.0",
"info": {
"title": "Sample API",
"version": "1.0.0"
},
"host": "api.example.com",
"basePath": "/v1",
...
}
openapi: 3.0.0
info:
title: Sample API
version: 1.0.0
servers:
- url: http://api.example.com/v1
description: Production Server
- url: https://sandbox.api.example.com/v1
description: Sandbox Server
...

You’re Not Using Components

One way of making an OpenAPI spec more readable is by removing any unnecessary duplication — the same way as a programmer would with their code. If you find that your OpenAPI spec is too messy and hard to read you might be under-utilizing the components section. Components provide a powerful mechanism for defining reusable schemas, parameters, responses, and other elements within your specification.

Let's take a look at the following example that does not utilize components:

openapi: 3.0.0
info:
title: Nested Query Example
version: 1.0.0
paths:
/users:
get:
summary: Get users with nested query parameters
parameters:
- name: filter
in: query
schema:
type: object
properties:
name:
type: string
age:
type: number
address:
type: object
properties:
city:
type: string
state:
type: string
country:
type: string
zipcode:
type: string
...
/user/{id}/friend:
get:
summary: Get a user's friend
parameters:
- name: id
in: path
schema:
type: string
- name: filter
in: query
schema:
type: object
properties:
name:
type: string
age:
type: number
address:
type: object
properties:
city:
type: string
state:
type: string
country:
type: string
zipcode:
type: string
...

The filter parameter in this example is heavily nested and can be challenging to follow. It is also used in its full length by two different endpoints. We can consolidate this behavior by leveraging component schemas:

openapi: 3.0.0
info:
title: Nested Query Example with Schema References
version: 1.0.0
paths:
/users:
get:
summary: Get users with nested query parameters
parameters:
- name: filter
in: query
schema:
$ref: "#/components/schemas/UserFilter"
...
/user/{id}/friend:
get:
summary: Get a user's friend
parameters:
- name: id
in: path
schema:
type: string
- name: filter
in: query
schema:
$ref: "#/components/schemas/UserFilter"
...
components:
schemas:
UserFilter:
type: object
properties:
name:
type: string
age:
type: number
address:
$ref: "#/components/schemas/AddressFilter"

AddressFilter:
type: object
properties:
city:
type: string
state:
type: string
country:
type: string
zipcode:
type: string

The second example is clean and readable. By creating UserFilter and AddressFilter we can reuse those schemas throughout the spec file, and if they ever change we will only have to update them in one place.

You’re Not Using Descriptions, Examples, Formats, or Patterns

You finally finished porting all your endpoints and models into your OpenAPI spec. It took you a while, but now you can finally share it with development teams, QA teams, and even customers. Shortly after you share your spec with the world, the questions start arriving: “What does this endpoint do? What’s the purpose of this parameter? When should the parameter be used?”

Lets take a look at this example:

openapi: 3.0.0
info:
title: Sample API
version: 1.0.0
paths:
/data:
post:
summary: Upload user data
requestBody:
required: true
content:
application/json:
schema:
type: object
properties:
name:
type: string
age:
type: integer
email:
type: string
responses:
"200":
description: Successful response

We can deduce from it that data needs to be uploaded, but questions remain: What specific data should be uploaded? Is it the data pertaining to the current user? Whose name, age, and email do these attributes correspond to?

openapi: 3.0.0
info:
title: Sample API
version: 1.0.0
paths:
/data:
post:
summary: Upload user data
description: >
Endpoint for uploading new user data to the system.
This data will be used for personalized recommendations and analysis.
Ensure the data is in a valid JSON format.
requestBody:
required: true
content:
application/json:
schema:
type: object
properties:
name:
type: string
description: The name of a new user.
age:
type: integer
description: The age of a new user.
email:
type: string
description: The email address of a new user.
responses:
"200":
description: Successful response

You can’t always control how your API was structured, but you can control the descriptions you give it. Reduce the number of questions you receive by adding useful descriptions wherever possible.

Even after incorporating descriptions, you still might be asked about various aspects of your OpenAPI spec. At this point, you might be thinking, "Sharon, you deceived me! I added all those descriptions yet the questions keep on coming.”

Before you give up, have you thought about adding examples?

Lets take a look at this parameter:

parameters:
- name: id
in: path
required: true
schema:
type: string
description: The user id.

Based on the example, we understand that "id" is a string and serves as the user's identifier. However, despite your QA team relying on your OpenAPI spec for their tests, they are encountering issues. They inform you that they are passing a string, yet the API call fails. “That’s because you’re not passing valid ids”, you tell them. You rush to add an example to your OpenAPI spec:

parameters:
- name: id
in: path
required: true
schema:
type: string
example: e4bb1afb-4a4f-4dd6-8be0-e615d233185b
description: The user id.

After your update your spec a follow up question arrives: would "d0656a1f-1lac-4n7b-89de-3e8ic292b2e1” be a good example as well? The answer is no since the characters 'l' and 'n' in the example are not valid hexadecimal characters, making them illegal in the UUID format:

parameters:
- name: id
in: path
required: true
schema:
type: string
format: uuid
example: e4bb1afb-4a4f-4dd6-8be0-e615d233185b
description: The user id.

Finally your QA team has all the information they need to interact with the endpoints that use this parameter.

But what if a parameter is not of a common format? That’s when regex patterns come in:

parameters:
- name: id
in: path
required: true
schema:
type: string
pattern: "[a-f0-9]{32}"
example: 2675b703b9d4451f8d4861a3eee54449
description: A 32-character unique user ID.

By using the pattern field, you can define custom validation rules for string properties, enabling more precise constraints on the data accepted by your API.

You can read more about formats, examples, and patterns here.

Conclusion

This list of shortcomings is certainly not exhaustive, but the most common and easily fixable ones presented in this post include upgrading from Swagger, utilizing components effectively, and providing comprehensive documentation. By making these improvements, you are laying the foundation for successful API documentation. When working on your spec, put yourself in the shoes of a new API consumer, since this is their initial interaction with the API. Ensure that it is well-documented and easy to comprehend, and set the stage for a positive developer experience.

You can read more OpenAPI tips in some of our other blog posts:

← Back to the liblab blog

Introduction

When working on applications and systems, we usually rely on APIs to enable integrations between services that make up our system.

The purpose of this article is to provide understanding of some important API metrics that are used to measure an API's performance. For each of those metrics, I will also touch on some factors affecting them and ways to improve them, which will in-turn enhance your API’s performance.

Overview of the key API metrics

To cover the API performance metrics metrics in a comprehensive manner, I divided this article into two parts. In this first part, I will talk about three key metrics, which are Response Time, Throughput, and Latency.

1. Response Time

Response time is basically the time it takes for an API to respond to a request from a client application. Response time gives us a measure of our application's responsiveness, which in-turn has an impact on user's experience.

Factors Affecting Response Time

  • Network Latency is simply the delay in network connection between client applications and your API. Congestion and increased physical distance between servers in a network are examples of situations that impact network latency.
  • If you make use of external or third-party services, then the overall response times of your API will also be dependent on the response times of those services
  • The response times of your API can also be affected by slow or poorly written database queries

Monitoring Your API's Response Time

Monitoring and analyzing response time can help identify bottlenecks, optimize API performance, and ensure service level agreements (SLAs) are met.

There are lots of tools out there that can be used to monitor your API's response time. Here are some popular ones:

  • Apache JMeter
  • Pingdom
  • Datadog
  • New Relic

Improving Your API's Response Time

There are several approaches you can take to improve the response time of your API:

  • Making use of a Load Balancer
  • Optimizing your code to ensure to reduce unnecessary computations, database queries, or network requests
  • Implementing caching mechanisms
  • making use of content delivery networks (CDNs)

2. Throughput

Throughput is simply the number of requests an API can handle within a given time period. It is an important metric for measuring an API's performance, and is usually measured in requests per second (RPS)

An API with higher throughput simply means the system can handle a larger volume of requests, which ensures optimal performance even during peak API usage periods.

Monitoring Throughput

Monitoring throughput in the context of API performance involves analyzing and optimizing various factors such as

  • Server capacity
  • Network bandwidth,
  • Request processing time.

Improving Your API's Throughput

By employing techniques such as horizontal scaling, load balancing, and asynchronous processing, you can ensure a higher throughput which will significantly improve your API's performance.

3. Latency

Latency is another key performance metric for analyzing the performance of an API. It's a measure of the time taken for a client to send a request and get back a response from an API server.

Factors affecting API Latency

Some known factors that affect latency includes:

  • API Response with large data sets
  • Network Congestion
  • Inefficient or poorly written code.

How To Minimize Latency

It is very important to reduce latency, as higher latency can lead to sluggish user experiences, increased waiting times, and reduced overall performance. Some ways to reduce latency includes

  • Employing caching mechanisms
  • Applying data compression techniques
  • Returning data in chunks
  • Optimizing network protocols

4. Request Rate

Request Rate is an API performance metric that measures the rate or frequency at which requests are being made to an API within a specific time frame.

It provides insights into the load or demand placed on the API and helps gauge its capacity to handle incoming requests.

By monitoring request rate, API providers can identify usage patterns, peak periods, and potential scalability challenges which will help to anticipate traffic spikes, and plan resource allocation accordingly.

Monitoring API Request Rate

Request rate is typically measured over specific time intervals, such as:

  • Requests per second (RPS),
  • Requests per minute (RPM),
  • or Requests per hour (RPH).

The different measurement intervals determines the granularity of the metric and allows you to analyze the request patterns over different time periods.

There are several tools available to measure and analyze request rates for your API. Here are some popular options:

  • AWS CloudWatch
  • Google Cloud Monitoring
  • Grafana
  • Datadog
  • Prometheus

Optimizing For Higher Request Rates

To be able to handle increasing request rates during peak periods or as a result of high usage of some particular business features, you can consider implementing the following techniques:

Horizontal scalingUsing horizontal scaling techniques, such as distributing the load across multiple servers or instances. By adding more servers or utilizing cloud-based solutions that provides on-demand scaling of resources, you can handle a higher volume of requests by leveraging the collective resources of multiple machines
Asynchronous processingBy Identifying time-consuming or resource-intensive operations that can be performed asynchronously, you can free up resources to handle more incoming requests. This prevents blocking and allows your API to handle a higher request rate, if such operations are offloaded to background tasks or queues
CachingCaching can significantly improve response times and reduce the load on your API, especially for static or infrequently changing data. Utilize caching techniques like in-memory caches or CDNs can help your API to efficiently handle higher request rates

5. CPU Utilization

CPU utilization is another important metric that measures the percentage of CPU resources used during the processing of an API request. It provides insights into the efficiency of resource allocation and can be a key indicator of API performance.

Factors that can impact CPU usage during API processing include inefficient code implementation, highly computational operations, and the presence of resource-intensive tasks or algorithms.

Monitoring CPU Utilization

To effectively monitor CPU utilization, developers can employ various tools to gain insights into CPU usage. Some examples are New Relic, Datadog, or Prometheus.

Ways To Improve CPU Utilization

Below are some ways to reduce CPU usage within your API:

Efficient Algorithm DesignAnalyze your API code for computational bottlenecks and optimize them by using efficient algorithms and data structures. This will help to reduce CPU usage for operations that would have been more CPU intensive
Throttling & Rate LimitingImplement throttling mechanisms or Rate limiters to control request rates and maximum number of API calls that can be made within a specific time. This will in-turn prevent overload on the CPU.
Load BalancingBy making use of a load balancer, you can distribute incoming requests across multiple servers, effectively distributing the CPU load.

6. Memory Utilization

Memory utilization refers to the amount of system memory (RAM) used by the API during its operation. Efficient memory management is crucial for optimal performance. Excessive memory usage can lead to increased response times, resource contention, and even system instability.

Ways To Improve Memory Utilization

Here are some key points to consider to improve memory usage within your API:

CachingEmploying the use of in-memory caching mechanisms to store frequently accessed data or computations. This reduces the need for repeated processing and improves response times by serving precomputed results from memory.
Data PaginationWhen dealing with large datasets, consider implementing pagination rather than loading the entire dataset into memory, fetch and process data in smaller chunks or stream it to the client as it becomes available. This approach reduces memory pressure and enables efficient processing of large datasets.
Memory profiling toolsUtilize memory profiling tools to identify memory bottlenecks and areas of high memory consumption within your API. These tools can help you pinpoint specific code segments or data structures that contribute to excessive memory usage.

Conclusion

In this article, we discussed the importance of measuring API performance and some key metrics that tells us how well our API is performing.

Improving API performance as well as building SDKs for an API are some of the many problems that most API developers face. Here are liblab, we offer a seamless approach to building robust SDKs from scratch by carefully examining your API specifications.

By leveraging services like liblab, API providers can generate SDKs for their APIs, further enhancing their developer experience and accelerating the integration process with their APIs.

← Back to the liblab blog

Introduction to REST API

We all understand the significance of APIs in software development, as they facilitate data sharing and communication across various software systems. Ensuring their proper functioning is paramount. Implementing proven conventions in your API can greatly enhance its scalability and maintainability. This post delves into versioning techniques and how leveraging existing tools can simplify the process.

Versioning is a key concept that enables your applications to maintain backward compatibility as your API evolves. Without proper versioning, any modifications made to your API could cause unexpected errors and disruptions in current client applications. REST API versioning allows you to introduce updates while ensuring earlier versions continue to function correctly.

Common Versioning Techniques

To implement versioning in your API, here are three popular methods:

  1. URL-Based Versioning: In this method, the version number is incorporated into the URL path. For instance, Version 1 of the API is represented by https://api.example.com/v1/resource.
  2. Query Parameter Versioning: This technique involves appending the version number as a query parameter in the API endpoint. For example, https://api.example.com/resource?version=1.
  3. Header-Based Versioning: With this approach, the version number is specified in a unique header field, such as Accept-Version or X-API-Version.

There is no unanimous consensus on the best approach, as each has its advantages. When choosing, consider the following:

Versioning typeProsCons
URL-based
  • Easy to shut down obsolete versions
  • Facilitates separation of authentication concerns for different versions
  • Compatible with most frameworks
  • Version is always clear and obvious
  • Requires adoption from the start; otherwise, it necessitates code refactoring
  • Difficulty in adding patch versions
Query parameter
  • Easy to implement in existing APIs
  • Allows for the addition of patch versions
  • Provides control over the default version provided to clients
  • Version might be optional
  • Challenging to separate authentication concerns
  • Harder to retire or deactivate obsolete versions
  • Potential confusion distinguishing between data version and API version
Header-based
  • Easy to implement in existing APIs
  • Allows for the addition of patch versions
  • Provides control over the default version provided to clients
  • Version might be optional
  • Challenging to separate authentication concerns
  • Harder to retire or deactivate obsolete versions

Now that you've selected a versioning technique, do you need to update all client applications every time a new version is deployed?

Ideally, keeping client applications up to date ensures optimal API utilization and minimizes issues. However, this doesn't have to be a complicated process if you employ the right tools: SDKs.

How SDKs Assist Client Applications in Adapting to Available Versions

SDKs (Software Development Kits) are libraries that handle API integration, including versioning, on behalf of developers. They offer the following benefits:

  1. Version Management and Compatibility: SDKs allow you to select the API version you want to use, simplifying the process of switching between versions.
  2. Handling Different API Versions: SDKs provide a unified interface for client developers, abstracting the differences between API versions. Regardless of the underlying version, developers can interact with the SDK using standardized techniques and models.
  3. Error Handling: Some versions might also handle errors differently, and SDKs will cover the required changes out of the box
  4. Compile-time errors: SDKs will also present you with compile-time errors when a major change has occurred between the versions, allowing you to save time on testing each change manually.
  5. Automatic updates: And last, but not least, if you are using an SDK provider, you don’t even have to worry about updating the SDK yourself, as all updates will be covered automatically.

To learn more about SDKs, check out this article on how SDKs benefit API management.

"You might wonder if building and maintaining an SDK is more challenging than adapting to newer API versions. After all, you would need to update the SDK to accommodate changes as well."

This is where liblab comes in. We offer an impressive suite of tools to effortlessly build robust and comprehensive SDKs from scratch. By analyzing your API spec, liblab can generate SDKs tailored to your API's needs. These SDKs are flexible and include all the necessary components out of the box.

If you love liblab, but your company hesitates to invest in new tools, check out this article on how to convince management to invest in the tools you need.

Conclusion

Properly versioning your REST API is crucial for its evolution and long-term stability. By utilizing versioning techniques such as URL-based, query parameter-based, or header-based approaches, you can manage changes while ensuring backward compatibility. Additionally, SDKs can assist client applications by abstracting API complexities, managing different versions, and providing consistent interfaces. By following best practices in REST API versioning, you can facilitate smoother transitions, enhance developer experience, and maintain strong relationships with your API consumers.

← Back to the liblab blog

Software development can be a complex and daunting field, especially for those who are new to it. The tech world's jargon and acronyms can be confusing to newcomers. You may have heard the term “SDK.” But what exactly is an SDK, and why is it important for software development?

More specifically, how can an SDK, when applied to an API, create huge benefits for your API management?

In this article, we'll take a closer look at what an SDK is and why it's an essential tool for developers looking to create high-quality software applications. You'll also come away with a clear understanding of the benefits SDKs have on API management, for both API owners and end users.

What is an SDK?

An SDK (software development kit) is a programming library made to serve developers and the development process.

A good use case for SDKs are APIs, the application programming interfaces that allow two programs, applications or services to communicate with each other. Without an SDK, a developer has to access the API via manual operations. Whereas with an SDK, developers can interact with the API using pre-built functionality, enabling quicker and safer software development.

How to Use SDKs for APIs

An API is the interface of an application by which a developer can interact directly with that application. An SDK provides tools that help a developer interact with the API.

To emphasize how using an SDK is different from interacting with an API via “manual operations,” we will juxtapose calling The One API to find a book with both methods below.

Calling The One API via Manual Operations

We will call The One API via a BASH script and JavaScript fetch method — both “manually.”

curl   -X GET https://the-one-api.dev/v2/book/1264392547 \
2 -H "Accept: application/json" \
3 -H "Authorization: Bearer THEONEAPISDK_BEARER_TOKEN"

This is a very basic way to query a server. It is available straight out of the terminal and gives you a way to describe the network request using arguments to one big command.

Explanation about the command:

  • curl ****the command for BASH to transfer data.
  • -X debugging mode, allows BASH to be more verbose.
  • GET is the method.
  • -H is a header option.

In other words: transfer data , do it with a get, and pass the headers Accept: application/json, Authorization: Bearer

JavaScript Fetch Method

async function fetchData() {
try {
const url = 'https://the-one-api.dev/v2/book/123';
const res = await fetch(url, {
headers: {
Authorization: `Bearer 12345`,
},
});

if (!res.ok) {
throw new Error(res.statusText);
}

const data = await res.json();
console.log(data);
} catch (error) {
console.log('error', error);
}
}

This is the most basic way to query a server with JavaScript. What you see here is an asynchronous function that queries the server, converts the request to JSON format and then logs the data it produced.

It is better than bash because:

  • Readability: Instead of arguments to one long command, you'd use an object which is more human-readable and less error-prone.
  • It handles an error. Instead of just logging the error, the try/catch block allows you to handle the situation where an error occurred.

Calling The One API via an SDK

import { TheOneApiSDK } from './src';

const sdk = new TheOneApiSDK(process.env.THEONEAPISDK_BEARER_TOKEN);

(async () => {
const result = await sdk.Book.getBook('123');
console.log(result);
})();

Notice that the SDK client allows us to use the book controller and getBook method to query the API. We set the headers when we instantiated the clients and we were ready to query the API. This approach is much easier to read and less error-prone.

This example is different from the two mentioned above because the user did not write the http request.

The http request is actually made behind the scenes (might be written with JS fetch too) by the maintainer of the SDK; this allows the maintainer to decide:

  • What network protocol is going to be used.
  • What is the destination of the network request.
  • How the headers should be set for the network request.
  • Readability: It's very clear which action the user wants to achieve, what is the controller, etc.

Who Benefits from SDKs?

There are many benefits to using an SDK. For the end users, it allows safer and cleaner access to the API. For the owners it ensures the API is used correctly and keeps support costs down.

SDK can reduce costs in many ways, including:

Retry strategy. When writing an SDK, you can add logic that prevents an SDK client from keep trying to query the API, therefore preventing unwanted calls to the API

Better use. Because the user does not query the API directly, the API receives better calls or more standardized input from its clients.

Speed up development. The SDK clients enjoy faster development because the requests from the server are standardized.

Code maintenance. When querying the API directly, you need to keep up with every update the API has done. Using an SDK facilitates this interaction and keeps up with the updates of the API. You do, however, need to keep your SDK up to date.

An SDK benefits the API user by:

  • Better understanding how to use an API through semantically-named functions, parameters and types.
  • Making it easier to invoke methods as they become readily available/discoverable via internal development environments (IDE)
  • Provides easier API access, with simple functions and parameters.
  • Prevents bad requests, and allows the user to correct their input.

An SDK benefits the API owner by:

  • Ensuring the required inputs from the user are in every request.
  • Preventing wrong inputs from being sent to the API server via enforcing types and validations.
  • Having an additional layer of validations to enforce response patterns. For example, if a user is sending too many requests, the SDK can warn and stop the user as they approach their limit.

Conclusion

Many API owners don't provide SDKs because of the difficulty and the development time involved with creating one, not to mention the onerous task of maintaining them. An API can have dozens or even hundreds of endpoints, and each one requires a function definition.